|
Daikatana Map
Editing Tools
Copyright
(C) Ion Storm 2000
Written
by John Romero with help from Bruce Ladewig
SECTION
1: IonRadiant for Daikatana - Install Instructions
Just so you know, Ion Storm does not support these map editing utilities at all so technical support
from Ion Storm or Eidos is not available. Check the forums at
http://www.planetdaikatana.com if you have
any problems and you might find an answer there.
IMPORTANT: Follow all instructions very carefully! Do
each step slowly and make sure you understand the instructions and what you are doing!
STEP ONE:
Before you do ANY editing with IonRadiant, you need to have some textures available for the editor to use,
so you'll need to download DaiPAK or PakScape. Unzip the utility into its own directory and run it. Open PAK1.PAK in the Daikatana/data directory. You'll see a list of folders and the
last one is "textures". Click on this and select "Extract the current
directory". This will take a long time, but when it's done, you're ready to get
IonRadiant up and running.
STEP TWO:
Here are the simple steps required to get IonRadiant up and running on your system so you can create maps
for Daikatana. You must have a fully-compliant OpenGL 3D accelerator. We've had a lot of trouble
getting IonRadiant running on anything other than a TNT-based
card, so beware!
| 1. |
Unzip the
DKMAPEDIT.ZIP files into a directory of your choosing. I would recommend a directory other than the directory
Daikatana resides. You will also save a bit of trouble if
you place this directory close to your root directory and stick to 8
letters, i.e., C:\DKTOOLS\
|
| 2. |
Edit the
SETTINGS.INI file with Notepad and change <utilsdir> on the
LastProject= line to point to the directory you just unzipped
DKMAPEDIT.ZIP into. Make sure to click Save.
EXAMPLE = LastProject=C:\DKTOOLS\settings.prj
|
| 3. |
Create a directory for editing maps. I would suggest
creating the directory outside the Daikatana directory and name it something simple with no spaces, like
DKMapDev or something. Additionally, I suggest keeping
the directory name length to 8 characters or less.
EXAMPLE = C:\DKTOOLS\DKMAPDEV\
|
| 4. |
Now you need to open up a command prompt. You can do
this by going to the Start menu and selecting Run...
Then type command and press enter. You need to be in the IonRadiant
directory to continue.
Type DKDIR <dkpath> <mapdevpath>
This is input by opening Windows Explorer, going into your \DKTOOLS\
(or whatever you called it) directory, and typing the info in.
See the following screen for an example.
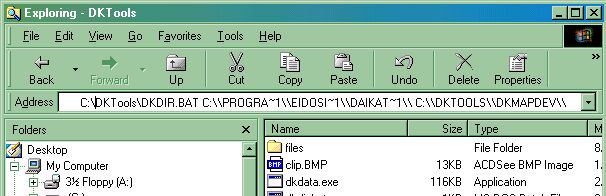
Where <dkpath> is the directory where Daikatana is installed and
<mapdevpath> is the directory
where you are editing map files. After doing this, there will be a SETTINGS.PRJ file in the
IonRadiant directory that you can edit manually if you'd like.
IMPORTANT: When you type the
<dkpath> and <mapdevpath> paths, make sure you use 2
"\" characters like so: d:\\games\\daikatana ...
or it will not work.
(Also, there's a COLORMAP.BMP file that will be copied to your Daikatana\data directory. Do not delete this
file.)
Long
directory names must be shortened to the first 6 letters plus ~1,
since feeding info to a batch file this way requires that you follow
DOS conventions. So as an example, the directory \DAIKATANA\
would be written \DAIKAT~1\. Spaces in directory names
are ignored, so \EIDOS INTERACTIVE\ becomes \EIDOSI~1\.
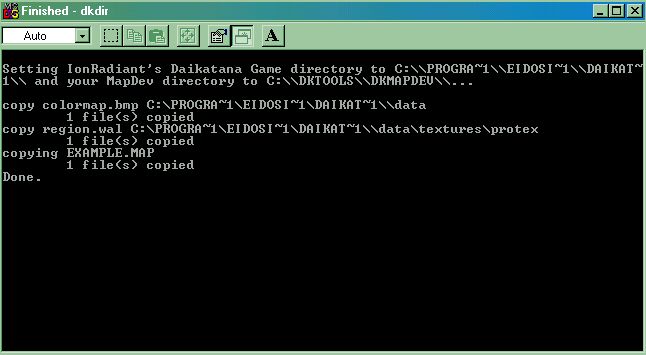
If
you've done everything right, you should see something like the
following:
|
| 5. |
Run
IonRadiant.exe
|
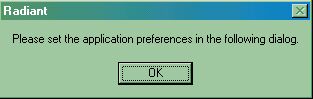
| 6. |
A
dialog will pop up... click OK.
|
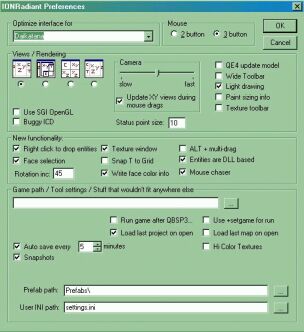
| 7. |
The
Preferences panel will pop up. Everything's already set correctly, so click
OK.
|
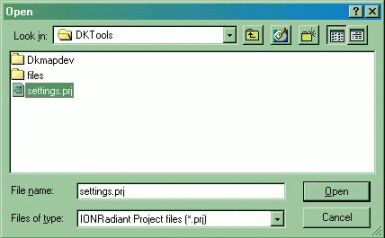
| 8. |
At this point, the main window should pop up and be
solid white. A dialog will pop up asking for the
project file. Select SETTINGS.PRJ and click OPEN.
|
| 9. |
The screen will completely draw and a dialog will
pop up. Click NO. Now you're ready to make maps!
NOTE: It's a good idea to quit
IonRadiant right now and immediately re-run it. This will make sure that your
settings are all saved in the registry.


|
You can either go to File->Open and go into the Example directory and open the
EXAMPLE.MAP and start playing around with a small example, or continue reading to start your own.
To begin making maps, first go to the Textures menu and select Load From
List. The "list" is the data/textures directory and all the texture directories will be listed.
Pick a directory and IonRadiant will load the textures for that level. The level you are about to create will use the
textures from the Daikatana level you selected. This also means you won't need to distribute textures with your maps
unless you decide to make your own texture directory.
For any map to work, you must enter a couple things in the WORLDSPAWN entity. The
Entity Panel is brought up with the N key. Once the dialog
pops up, use the top-right scrollbar to scroll all the way down
until you see WORLDSPAWN. Left click once on this.
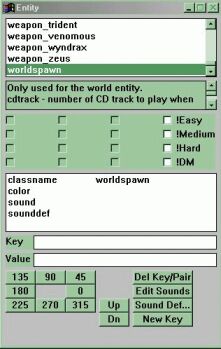
Then in the KEY field, type palette. In the
VALUE field, type the texture directory name of a map, i.e., the
texture directory you just picked in the step above, like e1m1
(for example). Then press ENTER. Next, you need to type (in the
KEY field): episode and in the
VALUE field you would type a number 1
through 4. This will define which weapons are used.
At this point, you'll need to refer to an IonRadiant manual that teaches you how to use the editor.
NOTE: If your map editing seems to be REALLY SLOW,
IonRadiant is using the default OpenGL driver (Microsoft's SOFTWARE OpenGL
renderer). This means your OpenGL driver for your 3D card is not fully OpenGL-compliant and the only thing you can do is
download the latest drivers for your card and hope they work.
SECTION
2: Compiling Your Map
There are three utilities used to create a map: QBSP3, QVIS3 and
QRAD3. We've included some batch files to make the process very easy. You
must run the utilities and batch files at a command prompt, so whenever you're using
IonRadiant, always open up a command prompt window by going to the
Start menu, choose Run... and type command
and press Enter. Make sure you are in your map development directory for the map you're
working on (by using the CD <path> command).
There are basically 3 ways to compile a map: Entities Only (ENTS.BAT),
Fast Compile (FAST.BAT) and Full Compile (FULL.BAT). You will mainly use the
FAST.BAT for most of your map's development. When you want to see
how fast your map runs or you're finished with it, you will run FULL.BAT to make it run as fast as possible. It takes
a long time to run a Full Compile on a map, so beware.
You only run an ENTS.BAT on a map if all you've done is moved some
NON-BRUSH-BASED entites around, like a PlayerStart entity, an armor entity, weapon, Hosportal, powerup, etc.
If you move a LIGHT entity, that's okay but the level will not show the effects of that
change until you do a FAST.BAT on the level again.
If you move a brush-based entity, meaning an entity that you actually created yourself, such as a
func_door, you will have to run FAST.BAT on the map.
These 3 BAT files all take one parameter and that's the filename of the map. So, if you're creating a map named
HELLKEEP, you would do a FAST compile by typing FAST HELLKEEP.
You don't need to type the ".map" at the end. Also, if you are going to compile a
MAP REGION (IonRadiant saves out extra map region files if you're in
REGION mode), you would add an underscore to the end of the map
name FAST HELLKEEP_.
IMPORTANT: Before you can compile your maps using these
batch files, you will need to add the path of where these utilities are located to your
PATH system variable. You can do this simply by typing (at the command prompt):
PATH=%PATH%;<utils dir> and press
Enter. Type PATH by itself to see if the path was
added correctly. This way, you can be in your map's directory and when you type
ENTS, FAST or FULL, the computer will run
the batch files and utilities from the directory they reside in, instead of requiring them to be in the
directory where your map is being developed.
|
|
Daikatana Custom Textures
Authored by Wayne W. Smith with help from Shawn Green
Original Tutorial Written
by John Romero with help from Bruce Ladewig
SECTION 1: Introduction
First, you will notice that this tutorial is similar in format to
the original DKtools tutorial and this was a deliberate attempt to keep
continuity. I am writing this due to the frustration many of author has
faced when trying to use the original DKtools to import custom
textures. Thanks to Shawn Green from Ion Storm for explaining what the
various programs were doing when converting textures to a format
Daikatana can use and helping me generate a workable batch file.
Normally, it's easiest to pick one of Daikatana's map texture
directories to use for your level's textures. But sometimes you might
want to create your own custom set of textures for your level. If you
are not going to create your own textures, do not read further!
Download this tutorial and the batch file.
SECTION 2: Creating your own Texture Directory for your map
| 1. |
The first thing you need to do is make
GFX and GFX8 subdirectories in the map directory where you're working
on your map. The directory structure should look like this:
DKMAPDEV
|
+-> YOUR_MAP
|
+-> GFX
|
+-> GFX8
If
you've done everything right, you should see something like the
following:
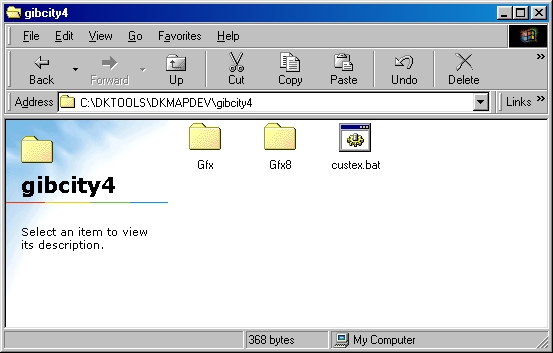
Hopefully you will notice in the above picture a file called "custex.bat"
Now is the time to extract or move this batch program into your map directory.
|
SECTION 3: Setting Up Custex.bat
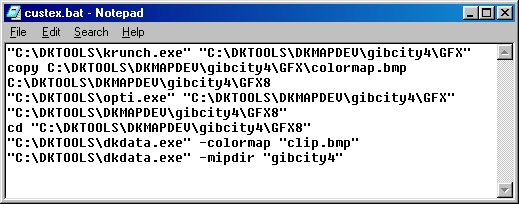
| 1. |
The "custex.bat program is a very simple batch program.
The
actual program is shown below:
|
| 2. |
IMPORTANT: Open up custex.bat in NOTEPAD and change gibcity4 to the name of your map.
|
| 3. |
VERY IMPORTANT: Please remember to resave "custex.bat" as "custex.bat".
YOU MUST TYPE IN THE .BAT EXTENSION.
|
SECTION 3: Getting Started
| 1. |
NOTE: This is the first time you are importing textures.
Now, you place all your graphics in the
GFX directory. The format for your graphics should be all 24-bit
BMP files. The dimensions must be a power of 2, such as 64x64,
128x128, 256x256, 16x32, 16x16, 64x32, etc. You cannot have a texture that is 48x56 for example.
|
| 2. |
IMPORTANT: Make sure you copy the
CLIP.BMP file from the IonRadiant directory into your
GFX directory before trying to process your graphics with the
custex.BAT file!
|
| 3. |
When you've filled the
GFX directory with all your 24-bit BMP textures, you need to run the
custex program. Just DOUBLE CLICK
on the custex.bat program icon.
The following will be done for you:
A 256-color palette will be generated from the 24-bit colors used in all the BMPs.
Your 24-bit BMPs will be converted to 8-bit BMPs.
A colormap will be generated from the 8-bit BMPs.
Your 24-bit BMPs will be converted to Daikatana WALs.
The colormap.bmp and all the WALs will be saved in the GFX8 directory.
|
| 4. |
Now that you've generated your colormap.bmp and WALs from the 24-bit BMPs, you need to COPY these files from the GFX8 directory to Daikatana.
|
| 5. |
Go to your Daikatana/data/textures directory and create a new file folder named for your texture set. This is the same name you used to replace gibcity4.
Now copy the colormap.bmp and all the WAL files from the GFX8 directory to your new Daikatana\data\textures\<mapname> directory.
|
| 6. |
At this point, you can check your Daikatana\data\textures\<mapname> directory and see that it's filled
with WAL files and the colormap.bmp. Now, in IonRadiant, you can use the
Textures->Load From List function and point to that directory to load
your textures up.
When you're finished with your level and all the textures, you need to distribute the map's
BSP file *AND* the map's texture directory you created. |
|