Daikatana Custom Textures Authored by Wayne W. Smith with help from Shawn Green Original Tutorial Written
by John Romero with help from Bruce Ladewig SECTION 1: Introduction SECTION 2: Creating your own Texture Directory for your map The first thing you need to do is make
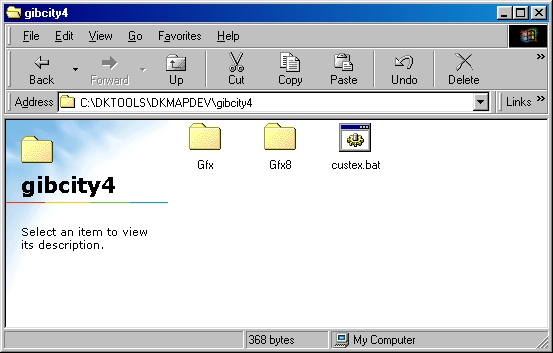
GFX and GFX8 subdirectories in the map directory where you're working
on your map. The directory structure should look like this: If
you've done everything right, you should see something like the
following:
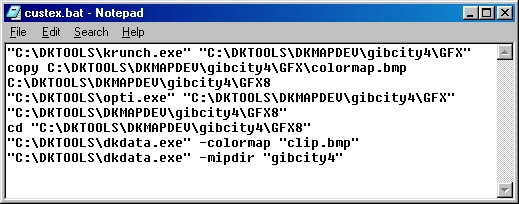
Hopefully you will notice in the above picture a file called "custex.bat" SECTION 3: Setting Up Custex.bat The "custex.bat program is a very simple batch program. The
actual program is shown below: IMPORTANT: Open up custex.bat in NOTEPAD and change gibcity4 to the name of your map.
VERY IMPORTANT: Please remember to resave "custex.bat" as "custex.bat".
YOU MUST TYPE IN THE .BAT EXTENSION.
SECTION 3: Getting Started NOTE: This is the first time you are importing textures. IMPORTANT: Make sure you copy the
CLIP.BMP file from the IonRadiant directory into your
GFX directory before trying to process your graphics with the
custex.BAT file! When you've filled the
GFX directory with all your 24-bit BMP textures, you need to run the
custex program. Just DOUBLE CLICK
on the custex.bat program icon. Now that you've generated your colormap.bmp and WALs from the 24-bit BMPs, you need to COPY these files from the GFX8 directory to Daikatana.
Go to your Daikatana/data/textures directory and create a new file folder named for your texture set. This is the same name you used to replace gibcity4.
Now copy the colormap.bmp and all the WAL files from the GFX8 directory to your new Daikatana\data\textures\<mapname> directory. At this point, you can check your Daikatana\data\textures\<mapname> directory and see that it's filled
with WAL files and the colormap.bmp. Now, in IonRadiant, you can use the
Textures->Load From List function and point to that directory to load
your textures up.![]()
First, you will notice that this tutorial is similar in format to
the original DKtools tutorial and this was a deliberate attempt to keep
continuity. I am writing this due to the frustration many of author has
faced when trying to use the original DKtools to import custom
textures. Thanks to Shawn Green from Ion Storm for explaining what the
various programs were doing when converting textures to a format
Daikatana can use and helping me generate a workable batch file.
Normally, it's easiest to pick one of Daikatana's map texture
directories to use for your level's textures. But sometimes you might
want to create your own custom set of textures for your level. If you
are not going to create your own textures, do not read further!
Download this tutorial and the batch file.
1.
DKMAPDEV
|
+-> YOUR_MAP
|
+-> GFX
|
+-> GFX8
Now is the time to extract or move this batch program into your map directory.
1.
2.
3.
1.
Now, you place all your graphics in the
GFX directory. The format for your graphics should be all 24-bit
BMP files. The dimensions must be a power of 2, such as 64x64,
128x128, 256x256, 16x32, 16x16, 64x32, etc. You cannot have a texture that is 48x56 for example.
2.
3.
The following will be done for you:
A 256-color palette will be generated from the 24-bit colors used in all the BMPs.
Your 24-bit BMPs will be converted to 8-bit BMPs.
A colormap will be generated from the 8-bit BMPs.
Your 24-bit BMPs will be converted to Daikatana WALs.
The colormap.bmp and all the WALs will be saved in the GFX8 directory.
4.
5.
6.
When you're finished with your level and all the textures, you need to distribute the map's
BSP file *AND* the map's texture directory you created.
SECTION 4: Adding more Textures
| 1. |
NOTE: This is the second time you are importing textures.
|
| 2. |
IMPORTANT: These steps are very important:
|
| 3. |
Now, you place all your additional graphics in the GFX directory.
|
| 4. |
Now you can go back and start with Step-3 from Section 3.
|